
Desserts
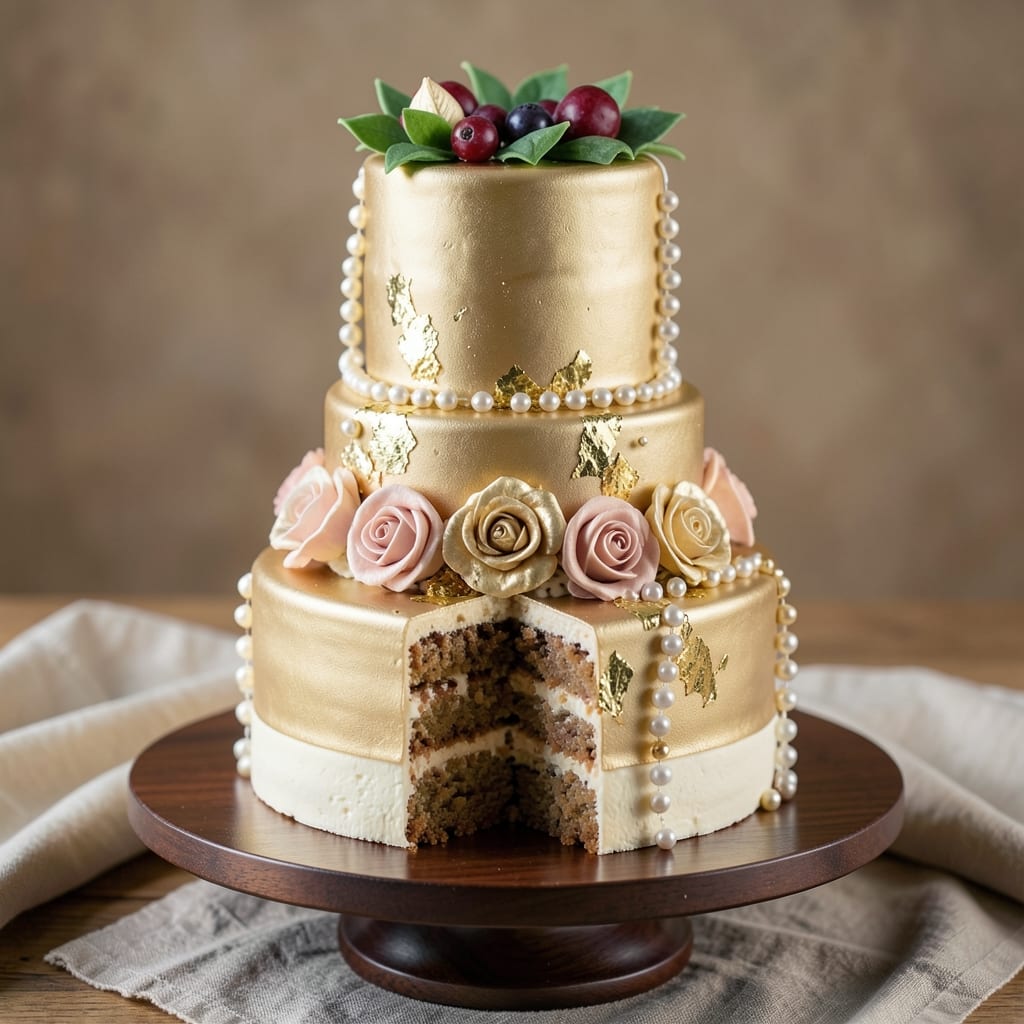
Celebrating a 50th wedding anniversary deserves a cake that feels as timeless as the milestone itself. This golden anniversary cake recipe combines classic elegance with show-stopping golden fondant towers that capture the golden anniversary tradition while feeling fresh and modern. The secret lies in perfectly balanced layers—light sponge cake, velvety buttercream, and a smooth fondant finish that transforms any table into a celebration of enduring love.
The recipe begins with a foolproof vanilla sponge cake that bakes to a tender, even texture, ensuring every slice is as beautiful as it is delicious. Between the layers, a rich vanilla buttercream adds luxurious creaminess, while the fondant exterior provides that signature golden sheen—ideal for capturing memories in photographs. Whether you prefer a traditional tiered cake or a modern single-layer masterpiece, this design adapts to your vision while maintaining the grandeur of a golden anniversary.
Decorating becomes an art with techniques like edible gold leaf accents and delicate floral details, elevating the cake from dessert to centerpiece. The fondant towers can be shaped into classic ruffles or sleek geometric forms, allowing you to blend tradition with contemporary style. Each element—from the golden fondant to the fresh floral arrangements—works together to create a cake that feels as personal as the couple’s love story.
Perfect for milestone celebrations, this cake balances restaurant-quality baking with home baker-friendly techniques, ensuring professional results without the stress. Whether you're baking for a couple’s golden years or simply treating yourself to a showstopper, this recipe delivers the timeless elegance every anniversary deserves.
Ingredients for 50th wedding anniversary cake
Golden fondant towers deserve these premium ingredients—each chosen for flawless texture and showstopping elegance.
| Ingredient | Amount | Notes |
|---|---|---|
| All-Purpose Flour 🌾 | 3 ½ cups | Sifted for light texture |
| Unsalted Butter 🧈 | 2 cups | Room temperature, European preferred |
| Granulated Sugar 🍚 | 2 ½ cups | Superfine for smooth batter |
| Large Eggs 🥚 | 6 whole | Room temperature, separated |
| Vanilla Extract 🌿 | 2 tbsp | Pure Madagascar bourbon |
| Baking Powder 🧂 | 2 tsp | Aluminum-free preferred |
| Salt 🧂 | ½ tsp | Diamond Crystal kosher |
| Whole Milk 🥛 | 1 cup | Room temperature |
| Powdered Sugar 🍚 | 4 cups | For buttercream, sifted |
| Heavy Whipping Cream 🥛 | 1 ½ cups | Cold, full-fat preferred |
| Vanilla Bean Paste 🌿 | 1 tbsp | Seeds scraped for intensity |
| Fondant 🎀 | 2 lb | White, pre-colored or tinted |
| Edible Gold Leaf 💛 | 1 sheet | 24k, 22 carat preferred |
| Fresh Rose Petals 🌹 | ½ cup | Dried if unavailable |
| Food Gelatin 🍬 | 1 tbsp | Bloomed in cold water |
The butter and flour are non-negotiable for that silky vanilla sponge. European-style butter like Plugrá or President gives richer flavor, but any good brand works. Sift your flour—twice if you're feeling fancy—because airy layers are everything. For the fondant, Wilton or Smooth-On brands are bakery favorites, but homemade (equal parts powdered sugar and marshmallow fluff) saves money. Skip the pre-colored fondant if you want to tint it yourself—gel food coloring mixes better than liquid. The edible gold leaf? Leaf International or Edible Gold Leaf brands deliver that luxurious shimmer. Pro tip: bloom the gelatin in cold water for 10 minutes—it dissolves faster than you'd think.
No vanilla bean paste? Double the extract, but trust me on the real deal for that depth. Running low on powdered sugar? Blend granulated sugar in a blender for 30 seconds—it's not the same but works in a pinch. The rose petals can be dried from your garden or bought in culinary sections at Whole Foods or Trader Joe's. For a shortcut, edible gold dust (mixed with a bit of vodka) gives similar glamour without the delicate application. And if you're nervous about the fondant, practice rolling it on parchment first—it's like playing with clay, honestly.
Store the cake layers wrapped in plastic at room temp for up to 2 days—they'll keep longer but the fondant starts to dry out. Buttercream? 3-4 days in the fridge, but bring it to room temp before using. Fondant towers can be shaped a day ahead and stored in an airtight container with a damp towel to prevent cracking. The gold leaf and floral accents should go on right before serving—no storage tricks here. Freeze the fully assembled cake (without gold) for up to 1 month if you're prepping early. Just thaw overnight in the fridge before decorating.
Why You'll Love This Recipe
- Here’s what sold me: this cake is the MVP of celebrations. Need a showstopper for a 50th anniversary? Layer it with cream cheese frosting and gold leaf. Short on time for a birthday? Drizzle it with chocolate and call it a day. It’s the chameleon of desserts—elegant or casual, depending on the occasion.
- Golden Classic Simplicity: I swear by this recipe because it’s the kind of cake that doesn’t need fancy tricks—just creamed butter, sugar, and eggs whipped to perfection. No stand mixers, no tempering eggs like a nervous first-timer; just a bowl, a whisk, and patience (well, 10 minutes of it).
- Vanilla’s Timeless Hug: That first spoonful of batter—warm vanilla swirling into the flour—is like a promise. It’s not overpowering, not artificial; it’s the real deal, the kind of flavor that makes you pause and think, This is why we bake. And when it’s done? Every slice tastes like nostalgia wrapped in buttercream.
- Double-Duty Cake: Here’s what sold me: this cake is the MVP of celebrations. Need a showstopper for a 50th anniversary? Layer it with cream cheese frosting and gold leaf. Short on time for a birthday? Drizzle it with chocolate and call it a day. It’s the chameleon of desserts—elegant or casual, depending on the occasion.
Step-by-step instructions for golden fondant anniversary cake
Here's how to craft timeless elegance with these precise techniques.
👨🍳 Step 1: Prepare the Classic Vanilla Cake Layers
Preheat your oven to 350°F and grease three 8-inch round cake pans with butter, then line the bottoms with parchment paper. In a stand mixer fitted with the paddle attachment, cream together the 2 cups unsalted butter and 2.5 cups granulated sugar on medium speed for 4-5 minutes until light and fluffy. You'll see the mixture nearly double in volume and become pale.
Add the 6 whole large eggs one at a time, mixing well after each addition. Scrape down the sides of the bowl to ensure even incorporation. Then add the 2 tbsp vanilla extract and 1 tbsp vanilla bean paste, mixing just until combined. In a separate bowl, whisk together the 3.5 cups all-purpose flour, 2 tsp baking powder, and 0.5 tsp salt. With the mixer on low speed, gradually add the dry ingredients to the wet, alternating with the 1 cup whole milk beginning and ending with the flour.
Divide the batter evenly among the prepared pans. Bake for 25-30 minutes or until a toothpick inserted into the center comes out clean. Let the cakes cool in the pans for 10 minutes, then transfer to a wire rack to cool completely before assembling.
🥘 Step 2: Create the Signature Buttercream Filling
In a stand mixer fitted with the whisk attachment, beat the 1.5 cups heavy whipping cream on high speed until soft peaks form. Gradually add the 4 cups powdered sugar and continue beating until the mixture is light and fluffy. Add the 2 tbsp vanilla extract and 1 tbsp vanilla bean paste, mixing just until combined. This buttercream should be smooth and pipeable—if it's too thick, add 1-2 tablespoons milk to reach the perfect consistency.
Spread a generous layer of buttercream between each of the cooled cake layers, pressing gently to ensure even coverage. This will create a luscious filling that complements the delicate fondant exterior. Chill the assembled cake in the refrigerator for 30 minutes to set the buttercream before proceeding to the fondant work.
🍳 Step 3: Craft the Timeless Gold Fondant Decor
Roll out approximately 1.5 lb of the 2 lb fondant on a clean surface dusted with powdered sugar to prevent sticking. Using a round cutter slightly larger than your cake base, cut out a smooth, even layer. Gently press this fondant layer onto the chilled cake, smoothing any air bubbles with your fingers. The fondant should adhere perfectly to the buttercream-coated cake.
For the golden accents, carefully apply the 1 sheet edible gold leaf to the top third of the cake, using a small amount of water or edible glue to help it adhere. The gold should shimmer like sunlight on a special occasion. Scatter the 0.5 cup fresh rose petals around the base of the cake for a romantic touch. These delicate petals add both beauty and a subtle floral aroma to your creation.
⏰ Step 4: Final Touches and Presentation
Prepare the remaining 0.5 lb fondant by rolling it thin and cutting into decorative shapes like flowers or leaves. Arrange these around the base of the cake for added dimension. For extra elegance, create a small fondant bow or monogram using the leftover fondant and place it on top of the cake. This personal touch makes the cake uniquely yours.
Let the cake sit at room temperature for 1 hour before serving to allow the fondant to fully set and the flavors to meld. The final result should be a stunning centerpiece that captures the essence of a golden anniversary—elegant, timeless, and utterly memorable.
Pro Tips For Making 50th Wedding Anniversary Cake
- Cream Butter Slowly: I learned this the hard way—whipping cold butter and sugar too fast just traps air unevenly, leading to a cake that collapses or tastes greasy. Take your time and mix on medium speed for 3-4 minutes until the butter turns pale and fluffy. That’s when the magic starts.
- Room-Temp Eggs Matter: Cold eggs from the fridge will curdle your butter mixture faster than you can say "golden anniversary." Let them sit in warm water for 10 minutes first—just enough to bring them to room temperature. Your cake will be smoother and richer, not lumpy.
- Don’t Overmix the Batter: I used to think more mixing = better structure, but this cake doesn’t need it. Once the flour is just combined, stop. Overworking it introduces gluten, and that’s how you end up with a dense, chewy cake instead of a tender, melt-in-your-mouth one.
- Bake in Two Rounds: If your cake pans are deep or your oven runs hot, bake the first round slightly longer (by 2-3 minutes) to set the center before flipping. This prevents a domed top or raw middle—especially important for a showstopper anniversary cake.
Dietary considerations for 50th wedding anniversary cake
Gluten-Free Adaptation
For a gluten-free version, replace the 3.5 cups all-purpose flour with a high-quality blend like King Arthur Measure for Measure or Bob's Red Mill 1:1 Gluten-Free Baking Flour. These blends mimic the texture of regular flour while maintaining structure. Add 1 extra tablespoon of xanthan gum to ensure proper binding—this is crucial for preventing crumbly layers. Use the same baking time, but check for doneness at 22-25 minutes since gluten-free cakes often bake faster. 🌾
Dairy-Free Options
Swap the 2 cups unsalted butter for 2 cups dairy-free butter like Miyoko's Creamery or Earth Balance, both of which mimic the texture beautifully. For the buttercream, use 1.5 cups coconut cream (chilled overnight) whipped with 4 cups powdered sugar and 2 tbsp vanilla extract. The fondant remains unchanged, but ensure your edible gold leaf is dairy-free certified—some brands use milk-based adhesives. 🧈
Nut-Free Considerations
This recipe is naturally nut-free, but always double-check labels on vanilla extract and vanilla bean paste—some brands process in shared facilities. For extra safety, use Nut-Free Vanilla Extract from McCormick. The fondant and buttercream are inherently nut-free, but verify your edible gold leaf packaging for allergen warnings. Store all ingredients in sealed containers to prevent cross-contamination. 🌿
Refined Sugar Reduction
Cut the 2.5 cups granulated sugar in half and replace with 1.25 cups coconut sugar or monk fruit sweetener (like Lakanto). For the buttercream, use 3 cups powdered sugar and 1 cup monk fruit sweetener blended together. The cake may be slightly denser, so bake for 28-30 minutes and let it cool completely before assembling. The fondant can be tinted with natural colorants like spirulina for gold instead of food dye. 🍚
Egg-Free Substitutes
Replace the 6 eggs with 6 tbsp aquafaba (chickpea brine) whipped to stiff peaks, or use 1.5 cups unsweetened applesauce for a neutral flavor. For the buttercream, ensure your dairy-free alternative is well-chilled to achieve proper stiffness. The fondant remains unchanged, but if you're avoiding eggs entirely, opt for a pre-made fondant like Wilton Sugar Freeze, which doesn’t require egg wash. 🥚
Nutrition facts
Frequently asked questions
Can I make this cake without fondant?
Swap the fondant for a smooth buttercream finish by coating the cake with a thin layer of vanilla buttercream and decorating with fresh flowers, gold-dusted sugar pearls, or hand-piped rosettes. For a rustic look, try a simple dusting of powdered sugar with edible gold sprinkles. The key is to keep the golden theme with accents like gold leaf or metallic luster dust.
How far in advance can I prepare the cake?
Bake the cake layers 2 days ahead and store wrapped at room temperature. Assemble with buttercream 1 day before, then cover with plastic wrap. Shape fondant decorations 24 hours ahead and store in an airtight container with a damp towel. Apply gold leaf and fresh flowers 4-6 hours before serving for the best presentation.
What's the best way to transport a decorated cake?
Use a sturdy cake board and wrap the entire cake (including board) in plastic wrap. Place it in a cake carrier or large box with plenty of padding. For fondant cakes, transport vertically to prevent smudging. Keep it in a cool, dry place until 1 hour before serving to let the fondant set properly. Avoid transporting cakes with delicate fondant flowers or gold leaf—assemble these at the venue instead.
Can I make this cake in a smaller size?
Yes! Scale down to a single 6-inch layer using half the batter and buttercream. For a tiered look, use a 6-inch bottom layer and 4-inch top layer with proportionally less fondant. Adjust baking time to 20-25 minutes for smaller pans. The golden fondant will still shine beautifully on a smaller scale—perfect for intimate celebrations.
What if my fondant cracks?
Don't panic! Gently smooth cracks with a tiny bit of water or edible glue, then press them back together. For larger cracks, cover with decorative fondant flowers or gold leaf to disguise them. Work quickly—fondant sets faster in dry air. If cracks appear after baking, they're usually just surface imperfections that won't affect taste.